Data Integration using Unity Catalog
In this topic we will describe how to create a data ingestion pipeline with various data sources, using Databricks (Unity Catalog enabled) for data integration and ingesting the data into Databricks Unity Catalog data lake.
| Source | Custom Integration | Data Lake |
|---|---|---|
| RDBMS - MySQL | Databricks | Unity Catalog |
| RDBMS - Oracle Server | Databricks | Unity Catalog |
| RDBMS - Microsoft SQL Server | Databricks | Unity Catalog |
| RDBMS - PostgreSQL | Databricks | Unity Catalog |
| RDBMS - Snowflake | Databricks | Unity Catalog |
| Amazon S3 | Databricks | Unity Catalog |
| FTP | Databricks | Unity Catalog |
| SFTP | Databricks | Unity Catalog |
| REST API | Databricks | Unity Catalog |
| Azure Data Lake | Databricks | Unity Catalog |
Prerequisites
-
Access to a Databricks node that has Unity Catalog enabled which will be used as a data integration node in the data ingestion pipeline. The Databricks Runtime version of the cluster must be 14.3.
-
Access to a Databricks Unity Catalog node which will be used as a data lake in the data ingestion pipeline.
Creating a data ingestion pipeline
-
On the home page of Data Pipeline Studio, add the following stages and connect them as shown below:
-
Data Integration (Databricks - Unity Catalog enabled)
-
Data Lake (Databricks Unity Catalog)
For the sake of an example, we are using FTP in the data source node.

-
Configure the data source node. If you are using CSV, MS Excel or Parquet as a data source, then do the following:
-
Click the source node. Select New Datastore and click Browse this computer. Select a file to upload.
-
In the Storage Type field, select AWS S3 and then select a configured storage instance on S3. You must have access to the configured storage instance to be able to view and select it.

Note:
In the data integration stage, if you are using a Databricks instance deployed on AWS, then you must select AWS S3 as the storage type. If you are using a Databricks instance deployed on Azure, then you must use Azure Data Lake as the storage type.
-
-
Configure the data lake node.
-
Click the dropdown Use an existing Databricks Unity Catalog, select an instance. Click Add to data pipeline.
-
Click the dropdown Schema Name and select a schema.
-
Click Data Browsing. Browse the folders and view the required files. This step is optional.
-
Click Save.
-
-
Click the Databricks node in the data integration stage. Click Create Templatized Job. Complete the following steps to create the job:
-
Template - Based on the source and destination that you choose in the data pipeline, the template is automatically selected.
-
Job Name - Provide a name for the data integration job.
-
Node rerun Attempts - Specify the number of times the pipeline rerun is attempted on this node of the pipeline, in case of failure. The default setting is done at the pipeline level. You can change the rerun attempts by selecting 1,2, or 3.
-
Fault tolerance - Select the behaviour of the pipeline upon failure of a node. The options are:
-
Default - Subsequent nodes should be placed in a pending state, and the overall pipeline should show a failed status.
-
Skip on Failure - The descendant nodes should stop and skip execution.
-
Proceed on Failure - The descendant nodes should continue their normal operation on failure.
-
-
Source - This is automatically selected depending on the data source node configured and added in the pipeline.
-
Datastore - The configured datastore that you added in the data pipeline is displayed.
-
File format - The selected file format is displayed.
-
Metadata - Click the arrow to view the metadata of the selected file.
-
Datastore - The datastore that you configured for the Databricks Unity Catalog is auto-populated.
-
Catalog Name - The catalog name that is selected for the Unity Catalog instance is auto-populated.
-
Schema - The schema that is selected for the Unity Catalog instance is auto-populated. If required you can change the schema at this stage.
-
Map source data to target tables - Map the source file with a table in the target. You can either map an existing table or create a new table and map it.
Do one of the following:
-
Select a table from the dropdown.
-
Type a name for a new table and click Click to create "table name".
-
-
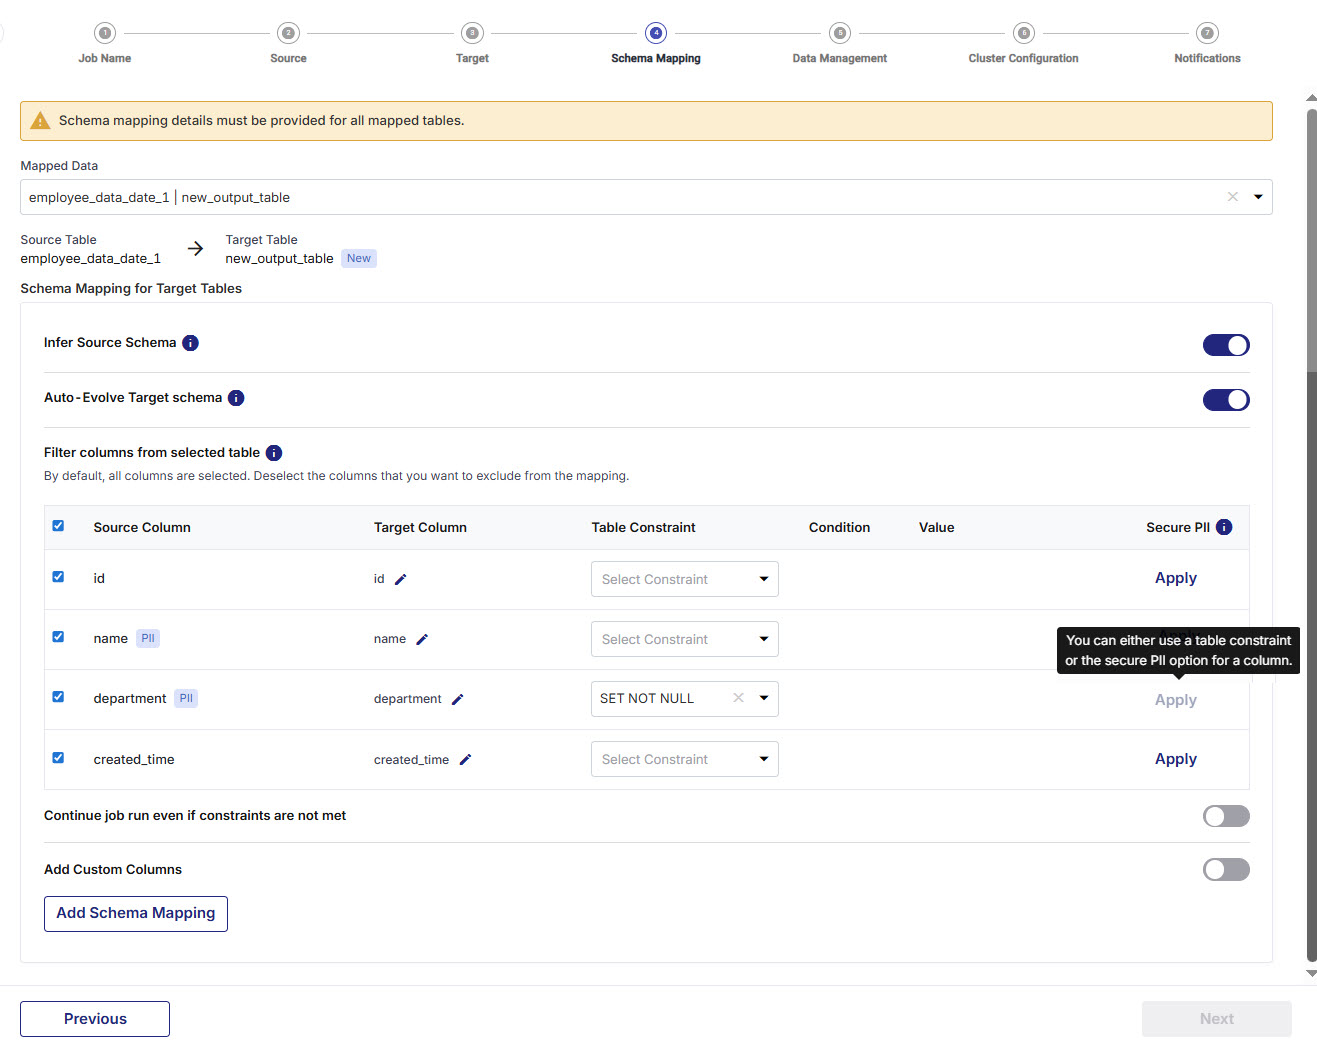
Mapped Data - Select the mapping of the source file with the target table that was done in the previous stage. You must provide schema mapping details for all the mapped tables.
-
Infer Source Schema - This setting identifies the schema of columns with data types automatically.
Note:
If this setting is turned off, you can manually edit the data types of source columns.
-
Evolve Schema - This option lets you add a column in the target table depending on the change in the source table.
Note:
If this setting is turned off, and a new column is added or dropped in the source table, the data integration job fails.
-
Auto-Evolve Target Schema - When this setting is turned on, the target table is automatically updated by adding any new columns detected in the source schema.
When this setting is turned off, the source and target schemas are compared. If discrepancies are found, you can explicitly specify whether the job should fail or proceed despite the mismatch, using the Ignore New Columns setting.
-
Ignore New Columns - Enable this setting to skip newly added columns and allow the pipeline to succeed. Disable this setting to process newly added columns and let the pipeline fail.
-
Filter Columns from Selected Tables - Deselect columns that you want ot exclude from the mapping, and either run a constraint on required columns or secure PII for columns with sensitive information.
-
Deselect columns that are not required, from the list of columns that is populated, and provide custom names to required columns.
-
Select a constraint from the options: Set Not Null and Check. For the check constraint you must provide a SQL condition and value to be checked for the column.
Note:
You can either apply a table constraint or use the Secure PII feature (masking or scrambling) on a column. Both options cannot be used simultaneously on the same column.
-
Secure PII - Apply masking or scrambling to secure PII. A column with protected PII is assigned string data type. For more information, refer to Securing Personally Identifiable Information (PII) in DPS.
Note:
A protected column cannot be used as a unique column for the merge operation.
-
Click Apply in the Secure PII column.
-
In the Secure PII side drawer select a PII protection method from the following options and click Save:
Method Details Scramble Select a scramble strategy from the available options. -
Apply similar scrambling to selected columns.
-
Select this option and then select the columns.
Mask -
Select a masking strategy from the available options.
-
Select a masking character.
-
Apply similar scrambling to selected columns.
-
Select this option and then select the columns.
-
-
-
-
-
Continue job run even if constraints are not met - This toggle when enabled, ensures that the job run is continued even if a constraint is not met.
-
Add Custom Columns - Enable this option to add additional columns apart from the existing columns of the table. To add custom columns, do the following:
-
Column Name - Provide a column name for the custom column that you want to add.
-
Type and Value - Select the parameter type for the new column. Choose from the following options:
-
Static Parameter - Provide a static value that is added for this column.
-
System Parameter - Select a system-generated parameter from the dropdown list that must be added to the custom column.
-
Generated - Provide the SQL code to combine two or more columns to generate the value of the new column.
-
-
Click Add Custom Column after adding the details for each column.
-
Repeat steps 1-3 for the number of columns that you want to add. After adding the required custom columns, click Add Column Mapping Details.
-
To review the column mapping details, click the ellipsis (...) and click View Details.
-
Click Next.
-
Operation Type - Select the operation type to perform on the source data. Choose one of the following options:
-
Append - Adds new data at the end of a file without erasing the existing content.
-
Merge - Adds data to the target table for the first job run. For each subsequent job run, the data from the target table is merged with the change in source data.
-
Overwrite - Replaces the entire content of a file with new data. This operation is not available for Amazon S3.
-
-
Enable Partitioning - Enable this option if you want to use partitioning for the target data. Select from the following options:
-
Data Partition - Select column name from the dropdown list. Select a column from the dropdown list. Click Add.
-
Date Based Partition - Select the type from the options - yearly, monthly , or daily. Provide the prefix that you would like to add to the partition. Adding a prefix is optional.
Note:
You cannot enable partitioning for an existing target table which does not have partitioning enabled.
Click Add. The Data mapping for mapped tables displays the mapping details. Click the ellipsis (...) to edit or delete the mapping.
-
-
Spot
-
On-demand
-
Spot with fallback
-
Select All
-
Node Execution Failed
-
Node Execution Succeeded
-
Node Execution Running
-
Node Execution Rejected
Provide job details for the data integration job:
Click Next.
Click Add Mapped Tables. To delete a mapping click the ellipsis (...) and then click Delete.
Click Next.
In this step you define the schema of the target table by using various options provided in this stage:
Schema Mapping for Target Tables - In this section you configure the various schema-related settings, filter columns from the source table that you want to include in the target table and apply constraints to the target columns.
In this step you select the operation type that you want to perform on the source table and the partitioning that you want to create on the target table.
Mapped Data - Click the dropdown and select the mapping that you performed in the previous step. The source table and target table details are provided.
Data Management for Mapped Tables
You can select an all-purpose cluster or a job cluster to run the configured job. In case your Databricks cluster is not created through the Calibo Accelerate platform and you want to update custom environment variables, refer to the following:
Updating Custom Variables for a Databricks Cluster
Cluster - Select the all-purpose cluster that you want to use for the data integration job, from the dropdown list.
| Cluster Details | Description |
|---|---|
| Choose Cluster | Provide a name for the job cluster that you want to create. |
| Job Configuration Name | Provide a name for the job cluster configuration. |
| Databricks Runtime Version | Select the appropriate Databricks version. |
| Worker Type | Select the worker type for the job cluster. |
| Workers |
Enter the number of workers to be used for running the job in the job cluster. You can either have a fixed number of workers or you can choose autoscaling. |
| Enable Autoscaling | Autoscaling helps in scaling up or down the number of workers within the range specified by you. This helps in reallocating workers to a job during its compute-intensive phase. Once the compute requirement reduces the excess number of workers are removed. This helps control your resource costs. |
| Cloud Infrastructure Details | |
| First on Demand |
Provide the number of cluster nodes that are marked as first_on_demand. The first_on_demand nodes of the cluster are placed on on-demand instances. |
| Availability |
Choose the type of EC2 instances to launch your Apache Spark clusters, from the following options: |
| Zone |
Identifier of the availability zone or data center in which the cluster resides. The provided availability zone must be in the same region as the Databricks deployment. |
| Instance Profile ARN | Provide an instance profile ARN that can access the target Amazon S3 bucket. |
| EBS Volume Type | The type of EBS volume that is launched with this cluster. |
| EBS Volume Count | The number of volumes launched for each instance of the cluster. |
| EBS Volume Size | The size of the EBS volume to be used for the cluster. |
| Additional Details | |
| Spark Config | To fine tune Spark jobs, provide custom Spark configuration properties in key value pairs. |
| Environment Variables | Configure custom environment variables that you can use in init scripts. |
| Logging Path (DBFS Only) | Provide the logging path to deliver the logs for the Spark jobs. |
| Init Scripts | Provide the init or initialization scripts that run during the start up of each cluster. |
You can configure the SQS and SNS services to send notifications related to the node in this job. This provides information about various events related to the node without actually connecting to the Calibo Accelerate platform.
| SQS and SNS |
|---|
| Configurations - Select an SQS or SNS configuration that is integrated with the Calibo Accelerate platform. |
|
Events - Enable the events for which you want to enable notifications: |
| Event Details - Select the details of the events from the dropdown list, that you want to include in the notifications. |
| Additional Parameters - Provide any additional parameters that are to be added in the SQS and SNS notifications. A sample JSON is provided, you can use this to write logic for processing the events. |
| What's next?Data Transformation using Unity Catalog |